

Can I Use 2x4 For Deck Joists


Deck Joist Sizing and Spacing
Bringing your favorite people together to enjoy a beautiful summer day on your deck is a great way to unwind and relax. And while it's important to have a deck that'south aesthetically pleasing to you, y'all first accept to make sure it'southward structurally sound. That includes knowing the difference between a joist and a beam and what purpose they serve to your deck and its functionality and safety.
What Is a Joist?
Joists are the repeated structural members that are used to build a deck frame. The minimum size joist used in deck construction depends on the distance the joists span between bearing points and the species and class of the treated lumber used to create the joists. The building code has very stringent minimum standards for the amount of weight a deck floor must be able to hold. You lot can determine the size of the joists using a span tabular array.
What Is a Axle?
A axle is the main load-begetting element for the structural soundness of your deck. It's not just responsible for supporting the weight of the joists but other building elements as well.
The joists sit on top of a beam or are fastened to a beam using joist hangers. Beams away from the business firm are almost e'er supported past vertical posts or columns. The size and construction of beams are very important and should be specified by an architect, a residential structural engineer, or the building department of your local municipality.
How Far Apart Should Deck Joists Be Spaced?
A lot of questions revolve effectually joists when it comes to building a deck.
- What is the proper placement?
- How far apart are floor joists placed?
- How do I keep them even?
The normal spacing for deck joists is xvi inches on center. Before you build a deck, verify this with your local building section and read the installation instructions for the decking fabric. Some decking materials installed at a 45-caste angle to the run of the joists require the joist spacing to exist 12 inches on center.
Your joist bridge volition depend on the size of the joists (i.e. 2X8 vs 2x10 vs 2X12). See the below span chart as well as the local codes and guidelines for your jurisdiction. The larger the bridge, the larger the joists.
In typical deck construction, with a ledger on one cease of the joist and a beam on the other, the size of the joists is driven by the size of the deck and based on the full general maximum spans mentioned above. For best results, refer to our wood and composite deck joist span table.
You can also use Decks.com's Joist Span & Spacing Calculator to decide how long your deck joist should span.
Deck Joist Spacing by Woods Blazon & Deck Size
| Joist Spacing (o.c.) | 12" | sixteen" | 24" | |
|---|---|---|---|---|
| Species | Size | Allowable Span | ||
| Southern Pine | 2x6 | 9'-11" | 9'-0" | 7'-seven" |
| 2x8 | xiii'-1" | 11'-ten" | ix'-8" | |
| 2x10 | 16'-2" | fourteen'-0" | 11'-five" | |
| 2x12 | 18'-0" | sixteen'-6" | 13'-half-dozen" | |
| Douglas Fir-Larch, Hem-Fir, Spruce-Pino-Fir | 2x6 | 9'-6" | viii'-4" | half dozen'-10" |
| 2x8 | 12'-vi" | xi'-1" | 9'-one" | |
| 2x10 | 15'-8" | 13'-seven" | xi'-1" | |
| 2x12 | 18'-0" | xv'-9" | 12'-10" | |
| Redwood, Western Cedars, Ponderosa Pine, Red Pine | 2x6 | 8'-10" | 8'-0" | 6'-10" |
| 2x8 | 11'-eight" | 10'-7" | 8'-8" | |
| 2x10 | 14'-11" | 13'-0" | x'-7" | |
| 2x12 | 17'-5" | 15'-1" | 12'-iv" | |
What are Joist Hangers?
Joist hangers are used to attach the ends of joists to the face up of a beam or a ledger board. Joist hangers must exist of the highest quality and canonical for contact with the newer treated lumber that has a college copper content. Each time it rains, a chemic brew is created from the rainwater touching the joists. This solution volition corrode substandard joist hangers and the fasteners used to connect them to ledger boards and flush beams.
What Virtually Attaching Joists to Ledger Boards?
Exist particularly cautious to follow an approved ledger connexion method to the house. Always follow local code guidelines for installing and properly flashing the ledger lath, or consider building your deck as a freestanding structure. Incorrectly installed ledger boards account for many decks collapses every year. Refer to the Decks.com article on ledger boards for more than information.
What are Other Joist Installation Considerations?
Joists are rarely perfectly straight. Well-nigh take a crown to them. Crowns can exist very helpful in preventing low spots mid-span in joists that are heavily loaded. You've probably never paid attending as you lot cross one, only about all bridges have a crown to them for the same reason.
If y'all identify a crown on the board, yous should always install it with the hump pointing upwards to the heaven.
The layout term for joists is "On Center," which is the centre-to-center measurement from ane joist to the side by side. Virtually decks use 16" on center spacing for joists. Virtually decking is not stiff enough to support wider spans than 16". Some builders reduce joist spacing to 12" on centre to strengthen the deck frame or to increment maximum allowable joist spans.
Joist Spacing for Blended Decking
Earlier building a composite deck, always read the installation instructions from the manufacturer, paying special attention to the required joist spacing for that specific composite decking. Most composite decking materials, like Trex composite decking, limit maximum joist spacing for composite decking to 16" on centre spacing for straight decking and 12" on center joist spacing for 45-degree angle diagonal decking.
Likewise, many composite decking materials require 12" or fifty-fifty nine" on middle stair stringers spacing to support composite stair treads. If you are installing composite decking over an existing frame, you may need to install new intermediate joists or stair stringers to meet the installation requirements.
Since most composite products are more flexible than their wood counterparts, they don't hide imperfections in the framing quite every bit well. This tin can sometimes cause an uneven surface. That'southward why stretching a string across the joist for composite deck boards can assistance detect spots that may be higher than others. These spots can be addressed with a ability hand planer to give you a more uniform surface for the deck of your dreams.
How to Infinite and Lay Joists For Decking
As they serve an integral role in the structural integrity of your deck, taking the time to learn how to space flooring joists is essential to the safety of the concluding result. Start by ensuring any existing structures are sound.
You lot'll also need your deck program gear up, including dimensions and layout for the railing, particularly if your railing installation method would otherwise interfere with the blocking of your frame. With a game plan and a little difficult piece of work, figuring out how to lay joists for decking can be relatively simple.
Materials & Tools Needed
Yous may need:
- Miter Saw
- Hammer
- Record measure out
- Drill
- Chalk Line
- Level
- Pencil/marker
- Wood screws
- Fasteners
- Spare Lumber
- Safety Glasses
Step one: Layout the first joist position on an angle.
Start your layout from one end of the rim joist and work towards the other. The position of your showtime joist will help guide the placement of the rest and make placing each subsequent lath simpler. For an angled corner, you lot can apply a scrap slice of wood as a guide to situating the outset joist into position.
Stride 2: Utilise a sharpie or structure pencil to marker your joists.
Mark out floor joist spacing locations at 16" on center spacing on the header with a pencil, marker, or chalk line. Draw an X on the side of the line where you want your boards to set. This tin can help plan the layout for the location of hanging hardware.
Stride 3: Toenail the joist to the rim joist.
Ensure the top of the joist is flush with the header, then connect the rim joist and showtime joist using screws or nails. Using a support beam can keep the joist in position while the connection is made. Proceed in mind that toenailing boards are inadequate for 75+ mph winds. In high wind areas, you'll need to secure each with hurricane clips.
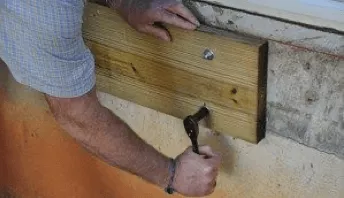
Step iv: Use a chisel to notch beams to create a level frame.
Notching a joist over a axle. This joist was 1/4" college than all the others. You can notch out a section of the joist or add shims to a narrow joist to even out the height of the deck frame. Be conscientious to non exceed the maximum allowed notch size in different locations of the beam spans.
Pace 5: Always fill all the boom holes for deck hardware.
Structural screws that accept a corrosion-resistant blanket provide a much better connexion than nails. The hole created by the nail can enlarge over time by expansion and wrinkle acquired by the wetting and drying of the lumber. Read the label on the box of structural screws to ensure they match the correct joist hanger. Simpson Strong-Necktie articles a full line of canonical hangers and structural screws. Don't skip any of the available boom hole spaces, as each is necessary for the stability, longevity, and safety of your deck. Failing to exercise so may besides affect warranties.
Step half-dozen: Inspect the board and trim off the rougher edge.
Measuring the 2x10 pressure treated joist length to prepare for cutting. Employ a speed foursquare to square off your joists. Pay attention to the crowning of the board for placement.
Step 7: Install Joists Crown Side Upwardly at Center
Standing from your first joist, install additional 2x10 pressure treated joists in sequence. Connect beams at 16" on heart (or your required spans as determined above). Be sure to install the joists' crown side up, ensuring any bowing in the board is facing upwardly. Don't forget to lift joists with your knees!
Pace eight: Install Hurricane Tie to Each Beam Connection
Utilise a Simpson Strong-Necktie H2.5Z Hurricane Tie, or equivalent, on every joist-to-beam connexion. Once over again, use Simpson structural screws instead of nails. Keep in mind that hurricane ties are not a replacement for solid blocking. And if you're installing ties on plated trusses, don't complete the fastening from behind the truss plate, every bit doing so tin compromise the performance of the hardware.
Building a safe frame can exist challenging work because even the smallest mistakes need to be remedied. Finding professional deck contractors nearly you tin can ensure your project is completed in accordance with all local codes, constructed on schedule, and upwards to the highest standards. Y'all tin too apply our notice a retailer tool for the most advisable materials or kits to brand installation easier.
How to Nail a Deck Axle
Learn how to nail a axle together. How many nails should you use? What type of nails should you use?
How to Sis Deck Joists
Larn almost how to sis deck joists over a beam for framing a big deck or adding onto an existing deck.
Decking Patterns
Installing your decking at a 45-degree bending is a pop mode for decks. This tin be done to reduce decking seams or just for advent.
Best Hidden Fasteners for Decking
Hidden fasteners create a make clean deck surface and can be used with composite, wood and other materials. Acquire about hidden deck fasteners at Decks.com.
More than Helpful Resource
Explore Articles by Topic

Footings
Information related to installing frost footings for decks

Framing
Learn structural framing methods
Decking
Acquire well-nigh wood and blended decking materials
Stairs
An in-depth look at the complex result of how to build stairs
Railings
How to install guardrails and handrails to run across IRC code

Features
An overview on water drainage, benches, planters and lights
Design
The basics of deck blueprint

Planning
Learn nigh permits and working with contractors

Porches & Patios
Build a covered deck to bask all seasons
Ledger
Proper zipper techniques

Intendance
Maintain your deck to maintain your investment

Materials
An overview on h2o drainage, benches, planters and lights
Deck Joist Sizing and Spacing
Bringing your favorite people together to enjoy a cute summertime twenty-four hour period on your deck is a bang-up style to unwind and relax. And while information technology's important to have a deck that's aesthetically pleasing to you, yous first accept to brand sure it'south structurally sound. That includes knowing the difference between a joist and a beam and what purpose they serve to your deck and its functionality and safety.
What Is a Joist?
Joists are the repeated structural members that are used to build a deck frame. The minimum size joist used in deck construction depends on the distance the joists span between bearing points and the species and course of the treated lumber used to create the joists. The building code has very stringent minimum standards for the amount of weight a deck floor must be able to hold. You can determine the size of the joists using a span tabular array.
What Is a Beam?
A beam is the main load-begetting element for the structural soundness of your deck. Information technology'due south not only responsible for supporting the weight of the joists merely other building elements likewise.
The joists sit on top of a beam or are attached to a beam using joist hangers. Beams away from the business firm are nearly always supported by vertical posts or columns. The size and construction of beams are very important and should be specified by an architect, a residential structural engineer, or the building section of your local municipality.
How Far Apart Should Deck Joists Be Spaced?
A lot of questions revolve around joists when it comes to building a deck.
- What is the proper placement?
- How far apart are floor joists placed?
- How practise I keep them fifty-fifty?
The normal spacing for deck joists is 16 inches on heart. Before you build a deck, verify this with your local edifice section and read the installation instructions for the decking material. Some decking materials installed at a 45-degree angle to the run of the joists require the joist spacing to be 12 inches on center.
Your joist span volition depend on the size of the joists (i.e. 2X8 vs 2x10 vs 2X12). Run into the below bridge chart as well as the local codes and guidelines for your jurisdiction. The larger the span, the larger the joists.
In typical deck structure, with a ledger on ane end of the joist and a beam on the other, the size of the joists is driven past the size of the deck and based on the general maximum spans mentioned above. For best results, refer to our wood and composite deck joist bridge tabular array.
You tin can likewise employ Decks.com'due south Joist Span & Spacing Calculator to determine how long your deck joist should span.
Deck Joist Spacing past Wood Blazon & Deck Size
| Joist Spacing (o.c.) | 12" | 16" | 24" | |
|---|---|---|---|---|
| Species | Size | Allowable Span | ||
| Southern Pino | 2x6 | nine'-11" | ix'-0" | seven'-7" |
| 2x8 | 13'-1" | xi'-10" | 9'-8" | |
| 2x10 | 16'-two" | fourteen'-0" | xi'-5" | |
| 2x12 | 18'-0" | 16'-6" | 13'-6" | |
| Douglas Fir-Larch, Hem-Fir, Spruce-Pine-Fir | 2x6 | nine'-six" | 8'-4" | 6'-x" |
| 2x8 | 12'-half-dozen" | 11'-1" | 9'-one" | |
| 2x10 | 15'-viii" | 13'-7" | 11'-one" | |
| 2x12 | 18'-0" | 15'-9" | 12'-10" | |
| Redwood, Western Cedars, Ponderosa Pino, Ruddy Pine | 2x6 | eight'-x" | eight'-0" | six'-10" |
| 2x8 | 11'-8" | 10'-7" | 8'-8" | |
| 2x10 | 14'-11" | 13'-0" | 10'-7" | |
| 2x12 | 17'-v" | 15'-1" | 12'-4" | |
What are Joist Hangers?
Joist hangers are used to attach the ends of joists to the confront of a axle or a ledger board. Joist hangers must be of the highest quality and approved for contact with the newer treated lumber that has a higher copper content. Each time information technology rains, a chemical brew is created from the rainwater touching the joists. This solution will corrode substandard joist hangers and the fasteners used to connect them to ledger boards and flush beams.
What About Attaching Joists to Ledger Boards?
Be peculiarly cautious to follow an approved ledger connexion method to the house. Ever follow local code guidelines for installing and properly flashing the ledger board, or consider edifice your deck every bit a freestanding structure. Incorrectly installed ledger boards account for many decks collapses every year. Refer to the Decks.com commodity on ledger boards for more data.
What are Other Joist Installation Considerations?
Joists are rarely perfectly straight. Most accept a crown to them. Crowns can be very helpful in preventing low spots mid-bridge in joists that are heavily loaded. You've probably never paid attention as you cross ane, merely well-nigh all bridges have a crown to them for the same reason.
If you identify a crown on the lath, you should always install it with the hump pointing upward to the sky.
The layout term for joists is "On Center," which is the center-to-heart measurement from one joist to the next. Most decks use 16" on heart spacing for joists. Most decking is not strong enough to support wider spans than 16". Some builders reduce joist spacing to 12" on middle to strengthen the deck frame or to increase maximum allowable joist spans.
Joist Spacing for Blended Decking
Before building a composite deck, always read the installation instructions from the manufacturer, paying special attending to the required joist spacing for that specific composite decking. Most composite decking materials, like Trex blended decking, limit maximum joist spacing for composite decking to 16" on centre spacing for straight decking and 12" on center joist spacing for 45-caste angle diagonal decking.
Also, many composite decking materials require 12" or even nine" on center stair stringers spacing to support blended stair treads. If you are installing composite decking over an existing frame, you lot may demand to install new intermediate joists or stair stringers to encounter the installation requirements.
Since most blended products are more flexible than their wood counterparts, they don't hide imperfections in the framing quite as well. This tin can sometimes cause an uneven surface. That's why stretching a string across the joist for composite deck boards can assist detect spots that may be higher than others. These spots can be addressed with a ability hand planer to requite you a more uniform surface for the deck of your dreams.
How to Space and Lay Joists For Decking
As they serve an integral function in the structural integrity of your deck, taking the fourth dimension to learn how to space floor joists is essential to the safe of the concluding issue. Start by ensuring any existing structures are sound.
You'll likewise need your deck plan prepare, including dimensions and layout for the railing, especially if your railing installation method would otherwise interfere with the blocking of your frame. With a game programme and a little hard work, figuring out how to lay joists for decking can be relatively simple.
Materials & Tools Needed
You may demand:
- Miter Saw
- Hammer
- Tape measure
- Drill
- Chalk Line
- Level
- Pencil/marker
- Forest screws
- Fasteners
- Spare Lumber
- Safety Glasses
Footstep 1: Layout the showtime joist position on an angle.
Start your layout from one finish of the rim joist and work towards the other. The position of your first joist will help guide the placement of the rest and make placing each subsequent board simpler. For an angled corner, you lot can use a flake piece of wood as a guide to situating the first joist into position.
Step 2: Use a sharpie or construction pencil to marker your joists.
Marker out floor joist spacing locations at 16" on center spacing on the header with a pencil, marking, or chalk line. Depict an Ten on the side of the line where you want your boards to set. This can aid programme the layout for the location of hanging hardware.
Footstep 3: Toenail the joist to the rim joist.
Ensure the top of the joist is flush with the header, then connect the rim joist and kickoff joist using screws or nails. Using a back up beam tin go along the joist in position while the connection is fabricated. Keep in listen that toenailing boards are inadequate for 75+ mph winds. In loftier wind areas, you lot'll need to secure each with hurricane clips.
Pace iv: Use a chisel to notch beams to create a level frame.
Notching a joist over a axle. This joist was one/4" higher than all the others. You tin can notch out a section of the joist or add together shims to a narrow joist to fifty-fifty out the meridian of the deck frame. Be careful to not exceed the maximum immune notch size in different locations of the beam spans.
Step v: Always fill all the nail holes for deck hardware.
Structural screws that accept a corrosion-resistant coating provide a much ameliorate connection than nails. The hole created by the smash can enlarge over time by expansion and contraction caused by the wetting and drying of the lumber. Read the label on the box of structural screws to ensure they friction match the correct joist hanger. Simpson Stiff-Necktie manufactures a full line of approved hangers and structural screws. Don't skip any of the available nail pigsty spaces, equally each is necessary for the stability, longevity, and condom of your deck. Declining to do then may too affect warranties.
Pace 6: Inspect the lath and trim off the rougher border.
Measuring the 2x10 pressure treated joist length to fix for cut. Use a speed foursquare to square off your joists. Pay attention to the crowning of the board for placement.
Step vii: Install Joists Crown Side Upward at Center
Standing from your starting time joist, install additional 2x10 pressure level treated joists in sequence. Connect beams at 16" on eye (or your required spans every bit determined above). Be certain to install the joists' crown side up, ensuring any bowing in the lath is facing upward. Don't forget to elevator joists with your knees!
Pace 8: Install Hurricane Tie to Each Beam Connexion
Use a Simpson Potent-Necktie H2.5Z Hurricane Tie, or equivalent, on every joist-to-beam connection. Over again, use Simpson structural screws instead of nails. Keep in heed that hurricane ties are not a replacement for solid blocking. And if you're installing ties on plated trusses, don't complete the fastening from behind the truss plate, every bit doing so tin compromise the performance of the hardware.
Edifice a safe frame can be challenging work considering even the smallest mistakes demand to exist remedied. Finding professional deck contractors near you tin can ensure your project is completed in accord with all local codes, constructed on schedule, and up to the highest standards. You can too apply our find a retailer tool for the nigh appropriate materials or kits to make installation easier.
Decking Patterns
Installing your decking at a 45-degree bending is a popular fashion for decks. This can exist done to reduce decking seams or just for appearance.
Decking Patterns
Installing your decking at a 45-caste angle is a popular manner for decks. This tin be done to reduce decking seams or simply for appearance.
Explore Articles by Topic
Footings
Information related to installing frost footings for decks
Framing
Learn structural framing methods
Decking
Learn about woods and composite decking materials
Stairs
An in-depth look at the complex event of how to build stairs
Railings
How to install guardrails and handrails to meet IRC lawmaking
Features
An overview on water drainage, benches, planters and lights
Blueprint
The nuts of deck blueprint
Planning
Learn almost permits and working with contractors
Porches & Patios
Build a covered deck to bask all seasons
Ledger
Proper attachment techniques
Care
Maintain your deck to maintain your investment
Materials
An overview on water drainage, benches, planters and lights
More Helpful Resources

Can I Use 2x4 For Deck Joists,
Source: https://www.decks.com/how-to/articles/deck-joist-sizing-and-spacing
Posted by: fitzgeraldlecous.blogspot.com
0 Response to "Can I Use 2x4 For Deck Joists"
Post a Comment